Search Me

Thursday, December 31, 2009


A Family and A Fistful of Coupons

When I first started out blogging, I never knew that I would be writing so much topics on BikeTrials. Since I started the sports in early 2008, I have been spending a lot of time learning and acquiring BikeTrial skills.

So I guess it is high time I focus this blog on BikeTrials and move all non-BikeTrials related topics to another new blog... :-)

The new blog is called "A Family and A Fistful of Coupons". It will cover general topics relating to life, family and my personal experiences.

I hope it will do as well as this blog. Cheers.


Wednesday, December 30, 2009


Putrajaya BikeTrials and Taxi Drivers

Yesterday, I had a great time riding in Putrajaya Bike Park with Wong Xu. It was a nice and cool afternoon with sporadic rain showers. We started at about 3:30pm and ended at about 6:00pm. Here are some photos and video of that afternoon.


Wong Xu showing me how to pedal hop to drop-off.


Wong Xu showing me how to dip and land on the front wheel from a rear wheel hop.


Wong Xu showing me a side hop.

We left at 6:30 pm to meet a friend of Wong Xu, also from China, who was interested in taking a look at my Monty 221PR and was thinking about buying a 20" trial bike. We waited at in Cyberia Apartments taxi stand in Cyberjaya for his friend to arrive.

Wong Xu told me that by end of February in 2010, there will be around 10 BikeTrial riders from China, whom will be studying here in Kuala Lumpur. Fun times ahead... LOL.

When Wong's friend arrived, I unloaded our bikes for him to try. He had been riding for more than 5 years in China. Since coming to Malaysia, he had been out of touch and I could see that he
knows the skills but lack the "sharpness" of daily riding.


Wong Xu's friend from China (I just could not pronounce or recall his name... LOL.)

While Wong Xu and his friends were trying out the trial bikes, the taxi drivers from the nearby Taxi stand were quite shocked and impressed. A couple of them could not resist and decided to try out the trial bikes for themselves.


The taxi drivers hanging out at their stand waiting for their fares.


One of the Taxi driver decided to try out the trial bike.


The taxi driver was laughing and surprised that he could not track-stand.


Another Taxi driver decided to give it a go on the trial bike.

The Taxi drivers had fun. We had fun. So all in all, it was a good day for trials... :-)


Saturday, December 26, 2009


BikeTrials at Home on Christmas Day

Finally had the chance to relax and ride some trials. What better day than on Christmas day itself... LOL. I did this in the last Christmas as well... :-)

Kids were excited about going to their aunt's place for Christmas dinner. The sky was slightly cloudy... just enough to hide the sun and provide the shade from the heat to make it a perfect day for trials :-)


After about 40 minutes into the session, I decided to shoot some videos and edit them into a movie.... Hahaha. Not exciting like those on Youtube. But it's still progress for me... LOL.

Tired as hell.... but loving every minute of it... Merry Christmas and a Happy New Year :-)


Wednesday, December 23, 2009


A Monty Sponsored BikeTrials Team in Malaysia?

Yesterday, I had the opportunity to meet up with the Malaysian distributor of Monty bikes, Humphrey of Guan Chow Sdn Bhd through Kevin of Tat Seng Bicycle Centre. Guan Chow Sdn Bhd is based in Ipoh, Perak. They are also the manufacturer of the widely available Exitway bicycles.

Coincidentally, before I even found out about the sports of BikeTrials, I bought an Exitway to ride cross-country in 2007... LOL. And in early 2008, I used the Exitway to learn the basic skills of BikeTrials like track-stands, pivoting and hopping.

In early 2009, I had heard that someone was bring in Monty trial bikes, but I had no idea who. And with an exception of a few, not many bicycle shops even dared to carry the Monty trial bikes (Monty Kamel 218 and 219) in their stores.

When I was at Tat Seng Bicycle Centre in Kota Kemuning looking for Ah Chun for a set of roller chain and to replace my Monty 221PR's rear wheel spokes, he mentioned to me that his boss (Kevin) knew the distributor of Monty bikes who was looking for a trial rider to sponsor. Basically, they wanted to promote BikeTrials in Malaysia through events and roadshows, and so he asked me if I knew of anyone whom might be interested.

Straight away Syarul and Aris came to mind, but they wanted someone who can perform BikeTrial tricks and feats... in the end, I suggested Wong Xu. Wong Xu has had the experience performing for TV shows in China, and locally in LimKokWing and UKM. So, taking that into account, Wong Xu should be the best candidate.

And so last Tuesday, I arranged for Wong Xu to meet up and demonstrate his BikeTrials skills to Kevin of Tat Seng Bicycle Centre and Humphrey of Guan Chow Sdn Bhd.


Tat Seng Bicycle HQ in Cheras.


Tat Seng Bicycle shop front.


A photo of Wong Xu in the shop.


I took a short video of Wong Xu demonstrating BikeTrials.

Humphrey was interested in promoting Monty for BikeTrials in Malaysia. He did mentioned that he was preparing to bring in riders from Monty, Spain, to conduct demos and roadshows. If he is, then I hope he will bring in Ot Pi or Dani Comas... LOL. Humphrey also said that he will let Wong Xu know if he will select him as part of the sponsored team.

In the meantime, he is also looking for riders to make a Malaysian BikeTrial Team. This team will be conducting roadshows throughout Malaysia to promote BikeTrials. Well, if he is, then I suggest he start off with Syarul and Wan Aris, and with Wong Xu as a guest star trial rider.

I hope to hear from Humphrey and Kevin again soon regarding BikeTrials. Maybe, they will be willing to set up a BikeTrial park... ah... if only... LOL.


Thursday, December 17, 2009


New And Newer Bicycle Roller Chains

Finally managed to get some time to update my blog today. Been busy running all over the place at work and at home. The kids will be starting school again in a couple of weeks. Me and the wife have been shopping for new school uniforms, shoes, text and work books for the kids.

Anyway, just to follow up on my roller chain mishaps, I managed to buy a replacement roller chain on Nov 30th. It was actually harder than I thought looking for a single-speed chain. In the end, I settled for a BMX roller chain from a bike shop in Sungei Way in Petaling Jaya.


The new BMX roller chain from Taiwan.

After installing the new roller chain on my Echo 26", I tried riding round. The roller chain kept slipping off my DIY roller chain tensioner. It was very annoying and frustrating.


The new roller chain (right) compared to the old chain.

I adjusted and re-aligned the tensioner to no avail. I continued riding, realigning and adjusting the tensioner a couple more times and decided to stop when I heard a "clink" sound, like something came off and dropped from the bike. I could not believe my eyes when I saw a piece of the roller chain link plate lying on the floor... LOL. "You have got to be kidding me," I thought.


A photo showing the link plate that came off the pins when I pedal kicked.

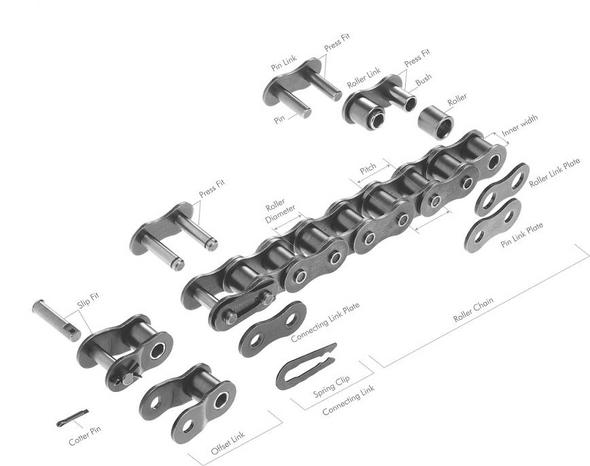
Apparently, the inner width between the link plates on the new roller chain were wider than the one that I had earlier, and that allowed one of the sprocket tooth to get caught in between the link plates, hence popping the link plate right off the roller chain! Scary!!!

Right after that I packed up everything and decided to call it a night. My plan was to go get a new roller chain the next day... LOL. And this time I was going to bring my old original roller chain with me for comparison.... LOL.

The next day and a couple of days later, I was just too busy with work to go looking for a new roller chain. It was only after a week later, on a Saturday (Dec 12th) that I decided to go to Kota Kemuning to look for Ah Chun of Tat Seng Bicycle Centre. I had decided to bring along my Monty 221PR to replace all the rear wheel spokes as well.

In my mind, I had thought that if anyone could help me with my bike problems, it would be Ah Chun... LOL. And sure enough, he recommended a set of roller chain that were suitable for BMX, Trials or Freestyle bikes!


The YBN roller chain.

That night, after I installed the new roller chain, everything came together perfectly! The chain was no longer coming off the tensioner sprocket and I could ride with confidence... but only after I had my eldest son, Joel, keeping an eye on the chain as I rode. I tried everything from hopping, pivoting, pedal kicking, etc. It worked great! Hahahaha. Confidence! Happiness!


Side view of the 3 roller chains, with the newest one at the bottom.


Top view of the 3 roller chains, with the newest one at the bottom. Notice the design? The bottom one is designed to be slip-proof!


The new roller chain installed on my Echo.


Closeup of the new roller chain on my Echo.

As for my Monty 221PR, I left it with Ah Chun and less than a week later, I got it back. Except for the brakes, the spokes were great! I had to re-tar the rims to maximise braking power... :-)

And now I have both bikes in good working conditions. From here on, I am back on training and riding... whoohu!


Monday, November 30, 2009


Roller Chain Snapped! Worse Nightmare Came True

After installing the V-brake chain tensioner that I DIY-ed last Thursday, I had been dying to ride my Echo!!! Unfortunately, I had to spend the weekend out of town in Johor Baru.

And so today, as soon as I had gotten back from work, I started my warm-up and practice routine on the 26". After about forty minutes, I decided to start on the pedal kick routine. That was when the roller chain snapped with a loud "crack". Freaked me out!!! One of the roller chain links broke. Thankfully, I managed to get the bike under control without any mishap!


The DIY V-brake chain tensioner. Still very solid and firm.


The broken roller chain. Check out those rust!

Ever since I had had that first experience with the roller chain snapping apart on me, I had been paranoid and wary of it happening again. And sure enough, it happened today.

When I was replacing the derailleur with my DIY chain tensioner, I was more or less aware that the roller chain was pretty rusted. In fact, after the first roller chain snapping apart experience, I had purchased a bottle of bicycle chain oil to lubricate the gears and roller chain. I had attributed the roller chain breaking to the derailleur. Now I think the rust probably played a big part.

It was very likely that I started maintaining the roller chain links way too late. Upon closer look today, certain parts of the chain links were pretty badly rusted.

So... what was the lesson learned? Constantly oil and maintain the roller chain to prevent rust from setting it!!!! Rust will weaken the metal!!! Guess I am going to shop for new bicycle roller chain tomorrow... gonna Google and see what are the best and lightest chain I can afford... LOL.

Btw, I regularly checked and maintained my pedals, brakes, wheels and stem. Mostly, I made sure that the nuts were tightened properly... :-) You should too!


Thursday, November 26, 2009


DIY V-brake Roller Chain Tensioner Completed!

Today I was on leave. My goal was to go around town hunting for a longer hanger screw that I could use to mount the DIY chain tensioner to my trial bike. In my last post, I wrote about how I made two versions of a roller chain tensioner using V-brake and derailleur parts.

Finally, today, I managed to find a screw that fit the hanger and long enough to be tightened securely onto the hanger. Earlier in the day I tried a couple of hardware shops but could not find even 1 screw that could even fit the hanger.

In the end, almost giving up, I decided to try a motorbike part shop next to one of the hardware shop. Voila! Would you believe it? I found exactly what I needed at the motorbike shop. Why is it that you always find what you need from the most unexpected places. And to top it off, the proprietor was very interested in my bike. He started asking so many questions about trials, to which I explained as best I could... LOL. And during all that time, he helped me mount the chain tensioner onto the hanger... sweet!

After that, I showed him how to start basic trial training on my bike and told him that he could train with any bicycle... LOL. In the end, I gave him my business card and told him that if he really wanted to pursue this sport, to contact me... :-)


The elusive screw that got me running around town... LOL. Using 2 washers as spacers and grip, the V-brake roller chain tensioner was mounted securely on the derailleur hanger.


Another view of the screw securely holding the V-brake chain tensioner.


The V-brake chain tensioner gripping the chain firmly without any slack.


Side view of the DIY V-brake chain tensioner.


The completed DIY V-brake chain tensioner.


The completed DIY V-brake chain tensioner in action... LOL.

Updated Post:


Monday, November 23, 2009


DIY Roller Chain Tensioner

I feel heavy! I have not been riding trials for 3 weeks already. Heavy rain everyday, broken rear wheel spokes on the 20" and a faulty derailleur on the 26" really put a damper on things!

The 20" Monty 221PR had been good to me. I had been training and riding it almost everyday. The problem was that one of the spoke broke. I got it repaired... and before I knew it, more spokes broke. From what I understand from a friend, when 1 spoke breaks, more will break soon after and that it is best to change all the spokes. I am still deciding what to do next.

In the meantime, I started riding my Echo 26". It went well for a while, until one day, when I pedal up, the roller chain broke and shot behind me into the pallet. Luckily, I managed to recovered without any injury... phew! Sure scared the heck out of me!


In the end, I found out that the cause for the roller chain to break was due to the derailleur casing. Apparently, the casing was out of alignment and the roller chain was rubbing against the sprocket casing. My guess was that the roller chain snapped when it was caught by the misaligned sprocket casing.


Anyway, I managed to re-attach and oiled the roller chain. But... I just could not bring myself to trust the roller chain again. I had lost almost all confidence in the chain and the derailleur.

And so, I had not been riding trials for the past 3 weeks. Then I remembered what a friend (Wong Xu) told me. He said that I could make my own roller chain tensioner. The basic idea was to use a V-brake arm coupled together with a roller chain sprocket from a derailleur to make a chain tensioner. He did not go into the details.

And so, last weekend, I decided to try make a chain tensioner out of a V-brake arm and an old derailleur sprocket.


I spent about USD2.50 to purchase one side of a V-brake arm. I removed the brake pad and spring from the V-brake as I only needed the arm bracket... :-)


From my Echo bike, I removed the roller chain and took apart the old derailleur. The only thing I wanted from the derailleur was the hanger and the sprocket. My plan was that the sprocket will be attached to the V-brake arm, and the V-brake arm will be attached to the hanger and then mounted on the bike.


I removed the sprocket from the old derailleur.


I needed to find a stainless steel nut that will fit the screw holding the sprocket. Had to visit several hardware shop before I found what I wanted.


I fitted the sprocket to the V-brake arm just to get a feel to see if I was going in the right direction.

After half a day of trial and error, I managed to come up with 2 ways of mounting the sprocket on the V-brake arm. Both did not work very well because the screw on the hanger was not long enough to mount correctly.

Version 1.0 of the Chain Tensioner

I did not like the way I mounted the sprocket. It was gripping the roller chain in a manner that did not inspire confidence with me... LOL. Also, the V-brake arm was mounted on the inner side of the hanger with a hanger screw that was too short, which did not allow me to tighten it as securely as I wanted.


Video of Version 1

Version 2.0 of the Chain Tensioner.

This second version was much better. I reversed the V-brake arm then used nuts and spacers to extend the reach of the sprocket to the chain. The sprocket was gripping the chain nicely. Problem was still at the hanger. I could not find a screw long enough to fully attach the arm onto the hanger securely.


Video of Version 2 in action.

After test riding with Version two for while, the chain became slacked. Tightening the screw on the hanger did not help either. I guess it is back to the drawing board.

I will probably have to think of a way to use a spring to provide added tension and also to find a longer screw that will fit the hanger!!!

Arrrgh!!! No bike to ride!!!

Related Post:


Sunday, October 25, 2009


7 Bikes in The House Now

Yup... there are seven bikes in my house now... LOL.

Back in 2005, we had one bike in the family and the bike belonged to my son, Joel. Then in 2007, I decided to go MTB cross-country cycling and bought myself an el cheapo Exitway. Then I got interested in BikeTrials and bought myself two trial bikes, a 26" Echo Pure and a second-hand 20" Monty 221PR, all for a couple of thousand dollars.


And then Joe had a "kiddy" bike that had outgrown his sons' use and he asked me if I wanted it. I said sure and with that bike I taught Joel, Jordan and Jodene how to ride bikes... LOL.

About a month back, I rented out my apartment to a very enterprising young man studying law. He had two bikes that were given to him by his other landlord. The bikes were VERY old and he heard me talking about cycling, thus he offered to give them to me.


The bikes were not in riding condition when I took them home. I managed to clean and get one of them working. I told Joel that he could have it, the Montana bike... LOL.

You should have seen how happy the nine year old were. He felt he was now riding an "adult" bike... LOL. Quickly, he called his younger brother, Jordan and told him that he could have the old bike... and likewise, Jordan told his younger sister, Jodene, that she can now have the "Uncle Joe" bike... LOL.

See how something that's old and considered junk by others, can have such a profound effect on other? (This gave me an idea for something I am currently planning to do but will only reveal later.)

The Lerun was in quite a sad shape. The rear tire had cracks and when I remove the tire, I noticed that the inner tube had melted and glued to the rim. I replaced the whole rear wheel with my old Exitway's spare wheel.

Then I tried to remove the front wheel from the Lerun. The quick release would not budge. I use some WD40 and still it would not budge. And so I decided to use the hammer on it and the following was the result.


I broke the quick release lever. Lucky for me, I still had the old Exitway's spare front wheel, but it was fitted with a disc brake. I tried installing the wheel on the Lerun anyway. But as you can see in the following photos... the disc was jammed up with the front absorbers!


I had some major problem removing the disc from the wheel. First the screw on the disc required a special screw-driver. Secondly, two screw's head were damaged and there were no way the screw driver's head could fit in. In the end, I took my old reliable hammer and whacked a flat head screw driver into the screw making a dent deep enough for me to unscrew the damn thing.


In the end, I managed to install the front wheel nicely onto the bike. Then I took it for a ride, that was when noticed that there was something wrong with the chain. Crap!


The chain was all badly rusted and could break anytime.


Since I did not have any spare chain at home, I decided to pack up the bike in my truck and took it to a bike shop in Bangi. Thirty minutes later, I was home with a pretty ride-able bike.


Finally, I got a bike for my wife to use. The hard part was to convince her to ride. After much much cajoling, yesterday evening, my wife and the whole family went cycling in our neighborhood.

Lets see if I can get everyone to go again tonight.


Installing a Rear Brake Booster on my Echo Pure

One of the first things I learned when I started BikeTrials was that braking was ultra important, especially the rear brakes. When I first bought the 26" Echo Pure trial bike, I discovered that when I used the rear brakes, the braking does not feel solid and tend to slip.

Then I tried grinding the rims, but still on more than a few occasions I fell over backwards a couple of times when I tried the rear wheel stand or pedal hops.

The reason the braking was not good was that the "seat stays" of the frame, where the brakes mounting were located (see bike parts illustration), will flex and expand each time the rim brakes were used. When the "seat stays" flex, the brakes will loose grip.

Since then I had been on a look out for a brake booster for my rear rim brakes. I tried looking in KL and Singapore and could not find any. Actually, I found some BMX brake boosters, but the fitting and screw holes did not fit. Some of my friends in Singapore told me that I could make my own. For a while, together with Sean, we were going to see if we could get some workshop to help fashion a brake booster of our own design... LOL

Anyway, when I rode with Wong Xu for the first time a couple of months back, I told him about my braking problem. Wong Xu told me that he had an old Echo Brake Booster he did not use any more and that I could have it. I offered to pay him for it but he insisted that I kept it... LOL.


The Echo brake booster.

Happily, I went home and tried installing the brake booster immediately... BUT... I found that I could not install the booster due to the rim brake bracket mounting getting in the way. Disappointed, I told Wong Xu the problem the next time we rode together.

Then he taught me a neat trick. He told me to get some old chain and dismantled them, then keep the chain rollers. The idea was to use the "rollers" as spacers so that the brake booster can be mounted above the bracket. Cool!


This photo shows the chain rollers that I needed.

The next challenge was to find the screws long enough and will fit exactly to hold everything together. The following photos shows the brake boosters installed on my bike.


Placing two rollers on each side, I managed to install the brake booster above the rim brakes mounting bracket. All in all, I used 4 chain rollers to do the job :-)


The brake booster after installation.


View of the brake booster from the top. This was the best I could do to align it properly.

After installing the brake booster, my Echo Pure felt and rode differently! I could feel the extra rigidness in the braking. Immediately, I felt more confident in the braking and have not look back since... LOL.