Search Me

Monday, November 30, 2009


Roller Chain Snapped! Worse Nightmare Came True

After installing the V-brake chain tensioner that I DIY-ed last Thursday, I had been dying to ride my Echo!!! Unfortunately, I had to spend the weekend out of town in Johor Baru.

And so today, as soon as I had gotten back from work, I started my warm-up and practice routine on the 26". After about forty minutes, I decided to start on the pedal kick routine. That was when the roller chain snapped with a loud "crack". Freaked me out!!! One of the roller chain links broke. Thankfully, I managed to get the bike under control without any mishap!


The DIY V-brake chain tensioner. Still very solid and firm.


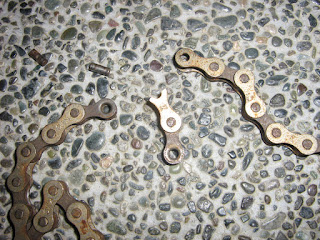
The broken roller chain. Check out those rust!

Ever since I had had that first experience with the roller chain snapping apart on me, I had been paranoid and wary of it happening again. And sure enough, it happened today.

When I was replacing the derailleur with my DIY chain tensioner, I was more or less aware that the roller chain was pretty rusted. In fact, after the first roller chain snapping apart experience, I had purchased a bottle of bicycle chain oil to lubricate the gears and roller chain. I had attributed the roller chain breaking to the derailleur. Now I think the rust probably played a big part.

It was very likely that I started maintaining the roller chain links way too late. Upon closer look today, certain parts of the chain links were pretty badly rusted.

So... what was the lesson learned? Constantly oil and maintain the roller chain to prevent rust from setting it!!!! Rust will weaken the metal!!! Guess I am going to shop for new bicycle roller chain tomorrow... gonna Google and see what are the best and lightest chain I can afford... LOL.

Btw, I regularly checked and maintained my pedals, brakes, wheels and stem. Mostly, I made sure that the nuts were tightened properly... :-) You should too!


Thursday, November 26, 2009


DIY V-brake Roller Chain Tensioner Completed!

Today I was on leave. My goal was to go around town hunting for a longer hanger screw that I could use to mount the DIY chain tensioner to my trial bike. In my last post, I wrote about how I made two versions of a roller chain tensioner using V-brake and derailleur parts.

Finally, today, I managed to find a screw that fit the hanger and long enough to be tightened securely onto the hanger. Earlier in the day I tried a couple of hardware shops but could not find even 1 screw that could even fit the hanger.

In the end, almost giving up, I decided to try a motorbike part shop next to one of the hardware shop. Voila! Would you believe it? I found exactly what I needed at the motorbike shop. Why is it that you always find what you need from the most unexpected places. And to top it off, the proprietor was very interested in my bike. He started asking so many questions about trials, to which I explained as best I could... LOL. And during all that time, he helped me mount the chain tensioner onto the hanger... sweet!

After that, I showed him how to start basic trial training on my bike and told him that he could train with any bicycle... LOL. In the end, I gave him my business card and told him that if he really wanted to pursue this sport, to contact me... :-)


The elusive screw that got me running around town... LOL. Using 2 washers as spacers and grip, the V-brake roller chain tensioner was mounted securely on the derailleur hanger.


Another view of the screw securely holding the V-brake chain tensioner.


The V-brake chain tensioner gripping the chain firmly without any slack.


Side view of the DIY V-brake chain tensioner.


The completed DIY V-brake chain tensioner.


The completed DIY V-brake chain tensioner in action... LOL.

Updated Post:


Monday, November 23, 2009


DIY Roller Chain Tensioner

I feel heavy! I have not been riding trials for 3 weeks already. Heavy rain everyday, broken rear wheel spokes on the 20" and a faulty derailleur on the 26" really put a damper on things!

The 20" Monty 221PR had been good to me. I had been training and riding it almost everyday. The problem was that one of the spoke broke. I got it repaired... and before I knew it, more spokes broke. From what I understand from a friend, when 1 spoke breaks, more will break soon after and that it is best to change all the spokes. I am still deciding what to do next.

In the meantime, I started riding my Echo 26". It went well for a while, until one day, when I pedal up, the roller chain broke and shot behind me into the pallet. Luckily, I managed to recovered without any injury... phew! Sure scared the heck out of me!


In the end, I found out that the cause for the roller chain to break was due to the derailleur casing. Apparently, the casing was out of alignment and the roller chain was rubbing against the sprocket casing. My guess was that the roller chain snapped when it was caught by the misaligned sprocket casing.


Anyway, I managed to re-attach and oiled the roller chain. But... I just could not bring myself to trust the roller chain again. I had lost almost all confidence in the chain and the derailleur.

And so, I had not been riding trials for the past 3 weeks. Then I remembered what a friend (Wong Xu) told me. He said that I could make my own roller chain tensioner. The basic idea was to use a V-brake arm coupled together with a roller chain sprocket from a derailleur to make a chain tensioner. He did not go into the details.

And so, last weekend, I decided to try make a chain tensioner out of a V-brake arm and an old derailleur sprocket.


I spent about USD2.50 to purchase one side of a V-brake arm. I removed the brake pad and spring from the V-brake as I only needed the arm bracket... :-)


From my Echo bike, I removed the roller chain and took apart the old derailleur. The only thing I wanted from the derailleur was the hanger and the sprocket. My plan was that the sprocket will be attached to the V-brake arm, and the V-brake arm will be attached to the hanger and then mounted on the bike.


I removed the sprocket from the old derailleur.


I needed to find a stainless steel nut that will fit the screw holding the sprocket. Had to visit several hardware shop before I found what I wanted.


I fitted the sprocket to the V-brake arm just to get a feel to see if I was going in the right direction.

After half a day of trial and error, I managed to come up with 2 ways of mounting the sprocket on the V-brake arm. Both did not work very well because the screw on the hanger was not long enough to mount correctly.

Version 1.0 of the Chain Tensioner

I did not like the way I mounted the sprocket. It was gripping the roller chain in a manner that did not inspire confidence with me... LOL. Also, the V-brake arm was mounted on the inner side of the hanger with a hanger screw that was too short, which did not allow me to tighten it as securely as I wanted.


Video of Version 1

Version 2.0 of the Chain Tensioner.

This second version was much better. I reversed the V-brake arm then used nuts and spacers to extend the reach of the sprocket to the chain. The sprocket was gripping the chain nicely. Problem was still at the hanger. I could not find a screw long enough to fully attach the arm onto the hanger securely.


Video of Version 2 in action.

After test riding with Version two for while, the chain became slacked. Tightening the screw on the hanger did not help either. I guess it is back to the drawing board.

I will probably have to think of a way to use a spring to provide added tension and also to find a longer screw that will fit the hanger!!!

Arrrgh!!! No bike to ride!!!

Related Post: