A blog about anything and everything BikeTrials by a wannabe biketrial rider, who is 50++ years old, that was born in Sibu, grew up in Miri, studied in Canada and now settled in Bangi. Yet he is still searching for that something... maybe the Spiders from Mars.
Went down to Singapore on Nov 27 and bought myself a new set of Magura HS33 rear rim brakes! Paid SGD 160 for it. Based on the advise given, I went for a 4 fingers lever. Suppose to give a better a better braking and performance.
Came back to KL on the night of Nov 28 and installed the brake the very next evening... LOL.
The old Echo rear rim brakes.
The box of the Magura HS33 rear rim brakes.
The rim brake with a VERY long tube.
The HS33 rim brake now installed on the ECHO Pure.
The old ECHO rim brakes packed away nicely... Never to be seen again? LOL.
The four fingers lever. I found it much more easier to apply pressure as it was longer and provided more leverage.
The ECHO Pure proudly installed with the HS33!
So what is the conclusion? How's the new brake? All I can say is that the ECHO Pure feels like a BRAND NEW bike! The handling is completely different and inspired confidence!!!
It had been quite a while since I took a good look at the condition of my 26" Echo Pure trial bike. I had noticed that the bolts were pretty rusted and some parts of the treads on the rear wheel tire were ripped off. I could see the tire's inner lining and reinforcement. Time for some major replacements.
The replaced rusted bolts just waiting to cause pain... LOL.
The new steel bolts on the front brake mounts. I changed all the bolts on both the front and rear brakes.
Replaced the stem's bolts as well. Wished I had some titanium bolts instead of the steel bolts... LOL.
Check out the tread on the rear tire. Ripped right off.
Another angle of the tire to show the ripped section.
While I was replacing all the bolts on the bike I noticed that one of the tube of the rear hydraulic brake was slightly dented.
I adjusted and twisted the tube and it sprung a leak. I tried readjusting the pressure of the hydraulic fluid at the brake lever, but made it worse. Lets just say I had hydraulic fluid all over the floor!
The screw on the brake lever to adjust the hydraulic pressure. Noticed that the screw had worn the gap in the lever. Sigh!
The hydraulic brake fluid leaking from the tube.
The next day, I took my bike to KSH bike shop in Taman Tun. Unfortunately, they were swarmed and could not help me out with the brakes. But they were kind enough to provide me with the tube and nozzle for topping up the hydraulic fluid (thanks guys!!). All I needed was the "injector" to connect to the tube.
The tube and nozzle given to me by KSH Taman Tun. Thanks guys! I will probably get to use it in future :-)
I was intended on heading home to try my hand at fixing and topping up the hydraulic fluids. But, somehow along the way, I side-tracked to Taman Megah and decided to stop at the Merida bike shop to get a new pair of tire. I ended up asking them to help top-up the hydraulic fluid. Took about 2 hours, but we managed to get it done.
Bleeding the hydraulic fluid at Merida bike shop.
Bleeding the brakes via the lever.
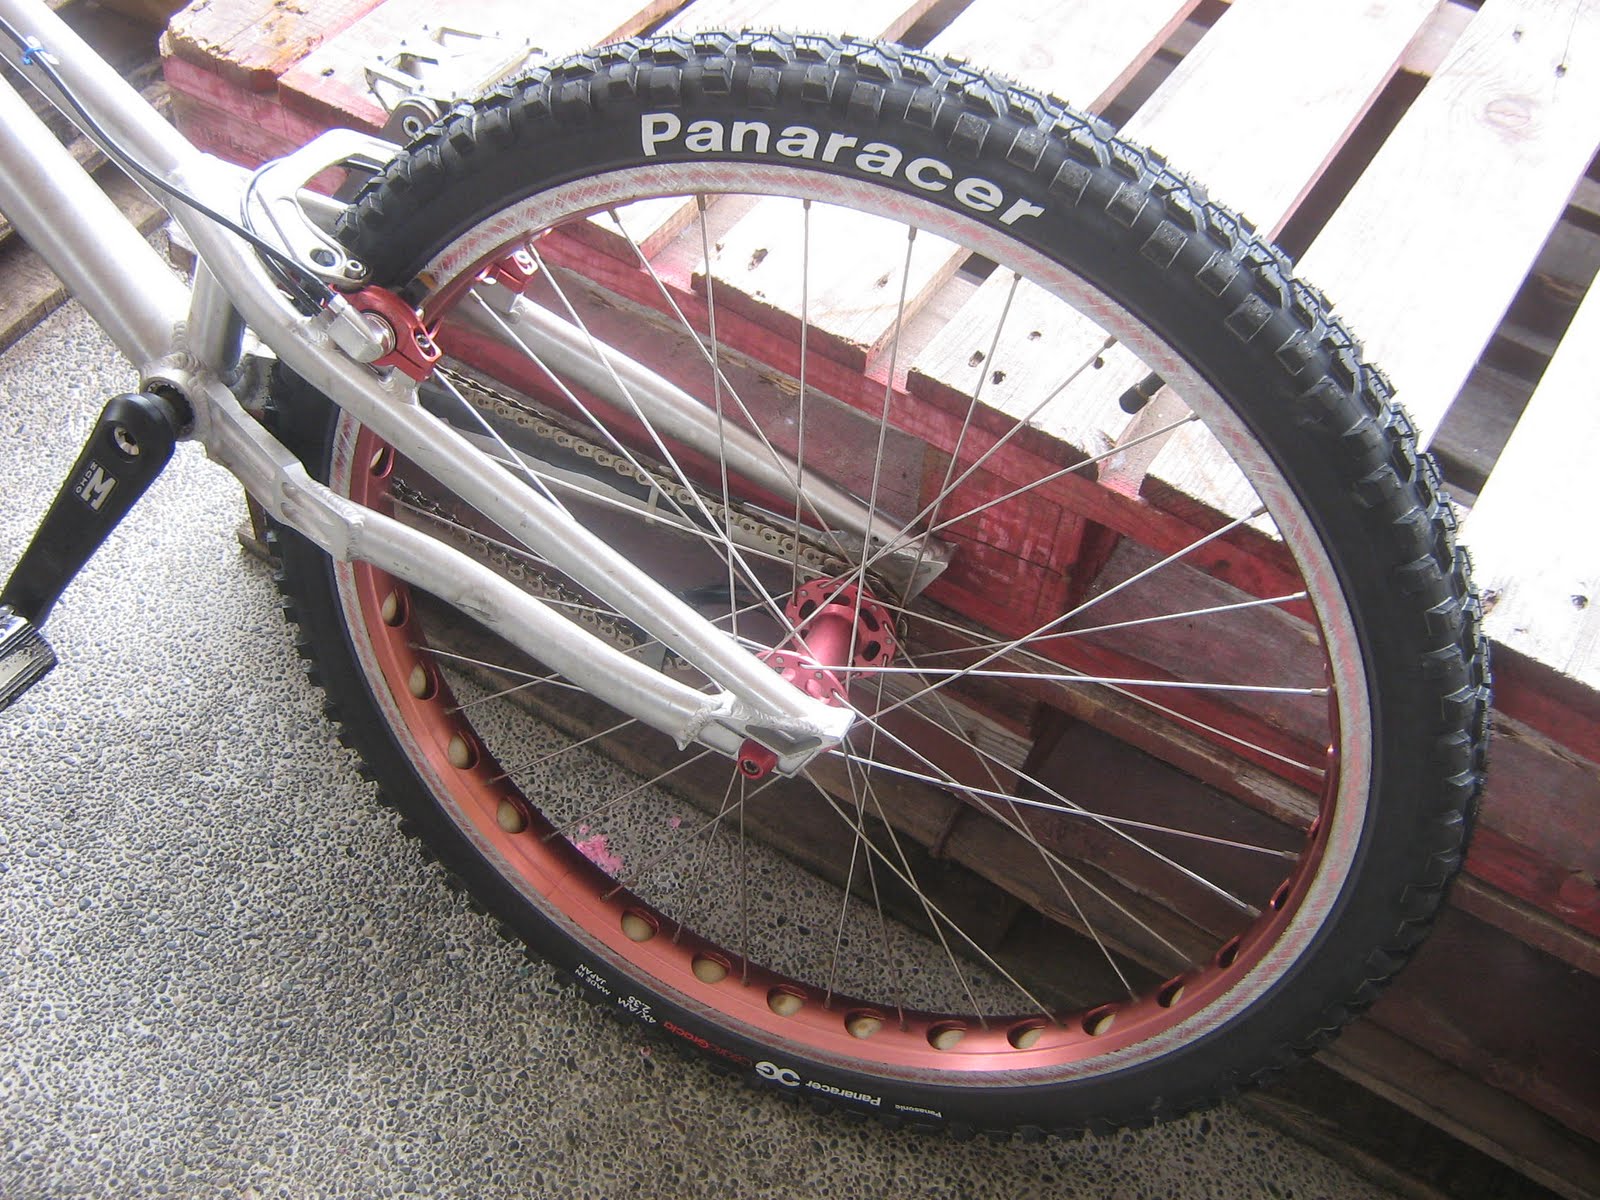
The new Panaracer tire that I bought.
The Panaracer tire in all its glory! I love the tire! Light and felt great to ride!
The brakes worked great. The tire felt good. But I felt that I still needed a new set of rear brakes. And so I texted Walton in Singapore and ordered a set of Magura HS33 rear rim brake.
Here are some tips or lessons you will need to know before you take on bike trials. You would have probably learnt it as you go along, but there is no harm to know about it now, to get a head start and cut short the leaning curve... :-)
One finger braking is a MUST if you want to take on this sport. Whether you are using hydraulic brakes or cable brakes. It is safer and you will have a better grip on the handlebar. Btw, if you have short index fingers, most "good" brake levers are adjustable to suit your fingers' reach.
Pedals with good grip are also a MUST. Depending on the sole on your shoe, you must feel that when you lightly rest your shoe on the pedal, you will get a good grip. This will prevent your shoe from slipping off during critical moments... :-)
Brake setup is critical, especially the rear wheel brakes. Grind the rim and get a brake booster (if you are using rim brakes). There is no such thing as "too much braking" in trials... LOL.
Depending on the pedals, you can quickly wear down the sole and side of your shoes. So far, I have not found a pair that can last me a year... LOL. So get a pair that you are comfortable with. Personally, I prefer a flexible sole.
I am trying out this new pair of Puma. The sole is flat and slightly hard. I hope the sole will get softer as I ride more.
Without a shin guard? You are asking for major grief! If you are using pedals with metal studs, I seriously suggest you get a nice pair of shin guard.
What can I say? Depending on the type of grips on your handlebar, gloves are essential for extra protection and grip. Some riders do not like gloves... but like I said, it really depends on the grips on your handlebar. Due to my sweaty palms, I need to use it for protection and better grip :-)
You can do without the rest.... BUT you cannot do without a helmet!! Can never say this or hear this enough! Never ride trials without helmet!!!
Most of the time, new riders (including myself during that time) will just jump into learning the basic trial techniques without being aware of how important some of the safety preparations are.
I wish I had started off with knowing some of the above tips, instead of learning while I went along. Would have saved me some grief... LOL.
For more than two months after I sold my 20" Monty, I have not been riding. Last weekend, I managed to get back to trials again on my 26" Echo. It was extremely tiring and I felt really clumsy handling the 26". All this while, I have been training and riding the 20".
In fact, I was trying to sell my Echo 26" for a while now, thinking that I could then focused on riding the 20" Monty. After advertising on all the online classifieds, I received a couple of enquiries, but no takers. Part of the reason was that I did not budge on the price... LOL.
In the end, I decided to let fate choose for me... LOL. That is to let the next person who wanted to buy a second hand trial bike choose which one he wanted, the 20" or the 26". And I will just concentrate on riding whichever bike is left behind. Turns out that the next person that wanted a trial bike, wanted a 24"... LOL...
After a couple of emails, Daniel decided to go for the 20" Monty. I was sad to see the bike go, but it was necessary as it was the only way for me to focus.
And so, last Saturday I was back on trials, this time 100% on the 26" Echo. I decided to make a movie of my ride to motivate me... LOL. I spend two and a half hours shooting 30 minutes of video footage, which I later edited into a 2 minutes video... LOL. The whole process was a great workout :-)
After a while into riding I was starting to get a proper feel of the 26" bike. It was slightly heavier than the 20". The feel and size of the wheels made the ride surprising easy as I could easily roll over gaps... LOL.
Last night, I was back on the 26" again. Essentially, I had to almost relearn all the techniques again... re-adjusting and compensating for the differences. I should be able to get use to it in no time... Heheh.
Anyway, I hope you enjoy the video. My whole body is still aching from the rides, especially my shoulders and arms.
After riding and training on these wood benches, I strongly feel that they are the perfect training accessory that every BikeTrial beginners should get... LOL.
Basically, the bench is about 20" high and 43" long. The width is about 12" at the top and 30" at the base. And so today, I made a short video to demonstrate what one can do with a single bench.
I am pretty sure that anyone else can probably do more than what I have shown in the video... LOL.
To a beginner like me, just repeatedly doing some of the basic moves will cause me to huff and pants like mad... LOL. Although my stamina is improved, there is still a lot of room for improvements... Hahah.
Nevertheless, I do hope that other BikeTrial beginners will make it a point to make one, two or three of these mobile wood benches for their own learning and training.
I am pretty sure that they will also come to appreciate the wood benches like me :-)
I finally managed to learn the Rear Side Hop in the "correct" way... LOL. That is... if I am right footed, I should side hop to the left. Previously I managed to rear side hop as well... but to the right... hahah. After being told my a friend, I decided to stop practicing the side hop all together... so that I could restart and learn all over again... HAHAH.
And today, I managed to do it!!! Three times, nonetheless... LOL.
Of course, I still need a lot of practice to be able to rear side hop consistently and also HIGHER!!! LOL... from watching the video, I could tell that I need to get a nice balance on the rear wheel first, before hopping up. And that I should maybe bend my knee more too.
I have also been trying to learn to pedal-hop up a bench and then pedal-kick from one bench to another. The tough part was to balance on the first bench before pedal-kicking to the next bench. Those pros made it look so easy!!! And here I am struggling :-)
Anyway, it was a great Sunday for my trial progress. Salute!
Managed to get some quality ride time today. Started late in the evening and then heavy rain prevented me from training on my usual wood pallet sections.
So I decided to practice pedal-hopping up a narrow bench. Pedal-hopping onto a stack of wood pallets is not a problem, but pedal-hopping onto a narrow wooden bench required more finesse... LOL.
Basically, I wanted to be able to do the static pedal-hop up the bench and the more dynamic pedal-hop onto the bench and then balance with only the rear wheel on the bench before pedal-kicking down to the other side.
Do the Monkey!
So while I was practicing, I told my 9 year old son, Joel, to help me take some videos so that I could analyze and see what I was doing wrong later. But as I was watching the videos later, I realised that he was singing a song lyric over again and again, "do the monkey"... LOL. It was hilarious... so I decided to make a short video clip... Hahaha.
Hope you enjoy watching it as much as I did while making it... LOL.
Anyway, my goal is to be able to pedal-hop onto the narrow bench, maintain balance on the rear wheel, and then pedal-kick to another narrow bench about 3 to 4 feet away. Gonna try it this weekend... :-)
Every so often I keep asking myself, "What's next?" Do I continue to just practice what little biketrial skills I already know to refine them or should I start learning new skills?
I get immense satisfaction from being able to learn a new trial riding skill and then honing that technique until I could do it consistently. But sometimes, it gets monotonous... LOL. Which is why, practice riding a "section" is so important... it allows me to use a combination of techniques and skills I have painfully acquired to come together in a symphony of movements that allows a rider to finish a section smoothly.
In the end, I always find out that it is not the lack of techniques or skills that prevent me from finishing an imaginary "section" that I predetermined. It is rather, my physical fitness (and fear of falling) that I call to question! LOL... I watched those YouTube videos and I always wondered how the heck those trial riders do it??? Never fail to amaze me... LOL.
The bench I made from the wood pallets. It was important that when I land on the bench, it will not budge or slide away. This was my biggest fear factor... LOL. Btw, I made 4 of these benches.
Anyway, I have been rebuilding the wood pallet sections in my house. In my last blog post, Homemade BikeTrial Training Park, I mentioned going around hunting for wood pallets and making benches. I had been planning to refine my pedal-kick. I needed to be able to pedal-kick from one bench to another and I wanted to do it consistently (you always see those riders do it so effortlessly in the videos... LOL). Anyway, watch the following video for my attempts... LOL.
I just needed to be able to do it three times. It was sort of a rule of thumb told to me by my buddy, Syarul, whom was told by Walton of BikeTrials Singapore... LOL. And so I did it three times... Hahah.
After that, two Saturdays ago, I went on a Wildgeeks cross-country riding re-union in FRIM. It was great riding and hanging out with the guys. Except for the fact that I had a pretty nasty crash... LOL. Ripped some skins off my left calf and had to get 4 stitches... no biggie, except that it was grouse to see the skin hanging there... LOL.
Photo of the geeks uploaded to Facebook by the John (aka The Rooster).
The 4 stitches... LOL. Photo by John (aka The Rooster). Btw, I told John to Twitpic my wound and say it was a snake bite... wicked!
So no riding for a while! That slight injury at FRIM caused me to be out for more than a week. I had no intention of prolonging the healing of the wound any longer than necessary. After spending so much time looking for the wood pallets, making benches, arranging and rearranging to make the training section, I could only admire it from a distance... more painful than the stupid wound!!! LOL...
Btw, I could not helped it. I have already started riding since Monday... LOL. Yeah... and it had bled a little... why am I so stubborn! Cheers!!!
On June 14th 2008, about 4 months into starting and learning BikeTrials, I brought home my first stack of wood pallets after attending the Red Bull Sponsored BikeTrial in Seremban, Negri Sembilan.
Soon after that, I started practicing on the wood pallets. I set up some mock sections to learn balancing and pedal hops. Gradually, the sections got bigger as my riding improved. I found more pallets and graduated to higher grounds... LOL. And now I have wood pallets stacked all over my house. Some of the pallets have begun to rot and come apart.... not safe to ride on any more. I took the old and rotten wood pallets on my pick-up and managed to dump them at a garbage land fill.
Two weeks ago on April 4th, I went hunting for wood pallets around the Nilai 3 warehouses in Negri Sembilan and found plenty!!!
After driving around some of the abandoned warehouses, I came across a huge stack of giant size pallets.
I packed six of them onto my pick-up and took them home.... in two trips... LOL.
I arranged this stack to hopefully use it to learn and practice the difficult side hop.
I sawed up two of the wood pallets and made them into benches, which I will use to practice balancing and rear wheel hop-up and pedal kicks.
I could also use the benches to stack on top of other pallets to create any challenging section I want... LOL.
This coming Sunday, I am planning to go back to Nilai 3 to get more of the giant wood pallets. Currently, I am thinking of making more benches of various heights.
Since the time when I first started out with training on wood pallets, I have not looked back. I would not have been able to learn so many BikeTrial skills or come this far without those wood pallets.
I am very sure that I am not alone in the quest to built a homemade BikeTrial training ground. I have see countless videos on YouTube and Vimeo of riders, pros and otherwise, training right at their own backyard... :-)
And thus... I am really looking forward to this Sunday. Gonna grab some more wood pallets and built me a BikeTrial Training Park... LOL.
Came across this video of a group of Canadian riders on YouTube... Stephen Dickin and Jeff Anderson, and this is their very inspiring video documentary, BikeTrials: Regaining Balance.
They compete in almost all BikeTrial tournaments throughout the World. They are currently looking for sponsors. Check out their website at http://trialsstars.com.
I wish them all the best in their World Championship quest!!!!
If you do not know who Kenny Belaey is and you are interested in BikeTrials... you GOTTA be insane!!! LOL. Here is an opportunity for you to find out all you need to know about this eight times BikeTrials World Champion!
From what I read from various sources, 3 videos were produced and broadcasted on Extreme Sportschannel in Europe, Africa and UAE from Dec 2009 to Jan 2010
I came across the trailer on YouTube but I could not find the videos. After googling, the videos were found on Vimeo.com and here they are. A MUST WATCH documentary for anyone interested in BikeTrials!
So what is this thing about the need for BikeTrial shoes? Recently, a fellow trial rider bought a pair of Monty BikeTrial shoes. I have been thinking about getting one for a while now. The design looked slick and beautiful, and I think probably very light and comfortable. The reason why I have not bought a pair yet, was because the price tag was too steep! (At least for me... LOL. I could buy a whole bunch of bike parts for that price... LOL.)
The Monty trial shoe at a hefty price tag of about MYR400 or £89.99. Ain't it a beau?
Since I started trial in 2008, I have gone through at least 3 pairs of normal shoes. They get worn out pretty fast, especially the sole and the side of the shoe near the ankle. And so early this year in January, I bought a 4th pair, which was really a cheap. Cost me about MYR29. Anyway, by February, the shoes looked like this:
As you can see they are pretty worn out. So now I am looking for a new pair of shoes for trials.... HAhah.
BikeTrial Shoe Safety Feature
Anyway, here are some of my personal experiences, which I wanted to share, that sort of explained why trial shoes are designed in certain ways... like the pair of Monty trial shoes above.
1. No Shoe Laces!
This one is a biggie! One time, while I was trying to pedal up onto a platform, I slipped on the pedal and my shoe lace was caught on the pedal's grip (see following photos). Hence, I could not use my feet effectively to counter balance myself and landed badly. Luckily my injuries were very minor.
Now imagine those pros in a competition, the sections would be hard and punishing. They cannot afford to let something like a shoe lace getting tangled on something to screw up their ride! I think this is the reason why the Monty trial shoes (and probably all cycling shoes) were designed without laces and instead used Velcro to fasten the shoe.
2. Cover the ankles!
Very often, my ankles get injured when I accidentally hit them against the side of the bike frame. During tournament, it is compulsory for riders to wear a pair of shoes that cover the ankles. I can totally understand why this rule is necessary.
3. Thick sole!
Trial bike platform pedals are required to have "super" grip... LOL. I think we all can understand why. This will enable the rider to get a good control of the bike. Almost 100% of the rider's ride is dependent on his feet getting a good grip on the pedals. Hence, the need for the shoes to have thick sole and not too soft that it gets damaged easily. A rider also needs to be able to "feel" the pedal beneath his feet. I have had 2 pairs of shoes that had worn out at the sole, to the extend that I could really feel the pedal's "teeth"... LOL.
And so, now I am on the hunt for a new pair of shoes for trials. Probably something like the one below.
This pair belonged to my son. Looking at it, I think it fit the above safety criteria. The hunt is on... :-)
Yesterday, my wife came out of the blue and said that she wanted to go cycling. I was like, "Er... is something wrong with you today?" Exercises of any sort has never been on her mind... no way! Even getting her to go for a walk around the neighborhood was almost impossible... LOL.
And today she wanted to go cycling! In the end I convinced her to try out BikeTrials, or at least just learn the track-stand... LOL. She told me that she wanted to change her lifestyle and start exercising, and lucky for me, she was convinced that cycling was the way to go... :-)
I told her that learning track-stand will be just as tiring as cycling a few laps around the neighborhood. And so, I took out my old cross-country bike. I was convinced that the center of gravity for the cross-country bike was low and thus, it would be easy for her to learn track-stand on that bike.
She tried to track-stand on the cross-country bike with much difficulty (incidently, it was the same bike I used, when I first started learning BikeTrials). The above video showed how she struggled to even balance for 5 seconds. Btw, if you are wondering why she was using slippers instead of a pair of shoes, lets just say that she was just plain stubborn... LOL.
After sweating and trying to track-stand on the cross-country bike for a while, I decided to let her try the 20" Monty 221PR. I figured, maybe, just maybe she will do better on the 20". If you watch the above video, you will see that she managed to track-stand for about 30 seconds! And this was just one of the many videos which I took that showed her balancing up to 30 seconds... :P
Damn... this was just too damn easy for her... and unfair!!! It took me quite a long time to learn to track-stand properly! And it took her just about an hour to pick up the skill? How come? Time to up the ante!!! Heheh!!
Hmm... lets see how she would do on my Echo Pure; very high center of gravity... will be tough... I thought. So, out came the 26" Echo Pure, and I got her to try it out. Honestly, I was quite blown away. The following video shows her track-stand on the 26" for more than 1 minute 30 seconds!!!!
How come? How come? What is the meaning of this??? I still have not figure it out yet... hmmm... maybe tomorrow, I will get her to try again. Beginner's luck lah... cheh!
Here is an update on my November 2009 post on "DIY V-brake Roller Chain Tensioner Completed!". Basically, I have added a "cage" to the roller to ensure that the chain stays on. What I discovered while riding was that there is an enormous amount of pressure exerted on the roller chain and the tensioner's roller.
Whenever the wheel comes in contact with the wooden pallets or other surfaces, the chain gets shaken intensively. This causes the chain to come off the roller and slacked, which is a VERY dangerous situation.
And so, as added security, I attached a soft tin metal plate to wrap around the chain to ensure that the chain will not derail when under heavy pressure. See the following photos of the DIY roller cage.
Up to now, I have had zero incident, where the chain would come off the roller. Lets keep it that way eh? LOL. While I was taking photos of the roller cage to update this blog, I noticed that the nut (or spacer nut?) holding the gear cog in place was completely loose! Unbelievable!
I unscrewed the nut (or is it a spacer) to take a closer look at the gear cog. Believe me, I was thankful that I noticed this now instead of later. A disaster waiting to happen. I am definitely adding this to my safety checklist before riding any bike!
I removed the chain roller so that I could get at the gear cog.
With the chain out of the way, I could tighten the nut holding the gear cog in place.
I took out my "Bike Hand" bicycle tool set to look for a tool to tighten the nut.
Heck... none of the tool could be used... LOL.
In the end, this 20 years old spanner did the job!